|
To create this set you will need PSP and Animation Shop Both available from Corel A Tube and a Close-Up I used art by Jessica Dougherty Tubes and License are availible at CDO Do not use this art without a proper license Font of choice I used P22 Petemoss(Pay Font) Kang 4 - Lens Fun DSB Flux - Bright Noise
Ready? Let's Begin!
Choose Light and Dark colors for your FG/BG It doesn't matter which Make a FG/BG Gradient Angle 90 - Repeats 0 New Image - 600x250 Fill with your Gradient Duplicate - Mirror - Blend Mode to Overlay - Merge DSB Flux - Bright Noise 40 - Mix Adjust - Blur - Blur Paste your Close-Up - Move right Opacity 60 - Merge Down Name it BG Duplicate this Layer twice - Hide the middle one On the top one Select All - Contract 5 - Delete - Deselect - Mirror DSB Flux - Bright Noise - 40 - Mix Drop Shadow 0, 0, 77 and 10 Name this Layer "Border"
Unhide the middle layer and highlight it Kang 4 - Lens Fun - All sliders set to 177 If desired you can colorize this Layer to match your tube Name this Layer "Animate"
Paste your Tube as a new Layer and move left Make sure this Tube Layer is just beneath the Border Give it a blurry Drop Shadow Crop your Tag to 600x250 Add your Name, CR Info and License # if necessary
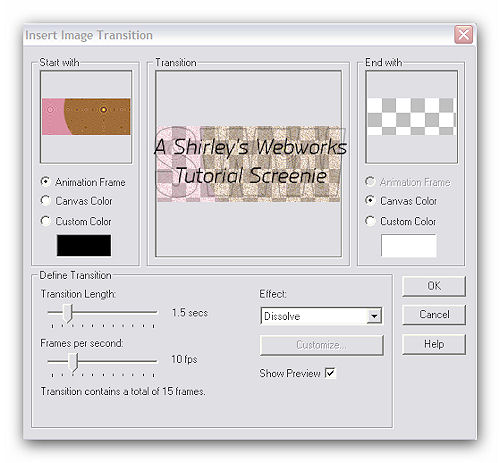
ANIMATION In PSP copy your Animate Layer Fire up Animation Shop Paste as New Animation Effects - Insert Image Transition
Edit - Select All Animation - Reverse Frames Edit - Copy Edit - Undo Reverse Frames Click on the last frame to select it Edit - Paste After Current Frame Now you should have 32 Frames
Back to PSP Highlight and copy your BG Layer Back to Ani Shop Paste as New Animation Hold down your ctrl key and hit L to make 32 Frames
Go back to your First Animation Edit - Select All - Edit - Copy On your Second Animation Edit - Select All Edit - Paste into Selected Frame - Click to Place Delete the First Animation - You don't need it anymore This is your Tag
Back to PSP Hide your BG and Animate Layers Edit - Copy Merged
Back to Ani Shop Paste as New Animation Hold down your ctrl key and hit L to make 32 Frames Edit - Select All - Edit - Copy On your Tag Edit - Select All Edit - Paste into Selected Frame - Click to Place
Select All - Animation - Frame Properties - 25 Scroll over and click the 17th Frame to Select it Animation - Frame Properties - 50 View Animation - If you're happy with it, save as a Gif Enjoy your new Tag!
Note: Your completed Tag is going to be kb heavy Mine is 1.02 mbs You might want to cull it for use in Forums that have Low kb limits for Sigs
Sample Set:
If you try this or any of my Tutorials Please leave a link in the comments section on my Blog
|