
For this tutorial, you will need:
PSP and Animation Shop-both sold by Corel
I used PSP X3, but this tutorial can be done in any version
MuRa Meister-Copies
Two tubes of choice in contrasting colors
I used the art of Ismael Rac
Tubes and license are available at his Store
This is an Intermediate Level Tutorial
Ready?
Lets Begin!
Open a new Image 600x600-transparent
Copy and paste one of your Tubes
On the Tube layer-MuRa Copies-Wallpaper Perspective
Change the top number to 215
Copy and paste your contrasting Tube as a new layer
Mirror and Flip
MuRa Copies again-same settings
Change the blend mode to Soft Light-Merge
Image-Resize-600x250 all Layers Checked
Lock Aspect Ratio Unchecked
Duplicate Layer-Motion Blur 45, 100%-Twice
Blend Mode to Hard Light-Merge
Rectangular Selection tool- Select a rectangle across the tag
See my example for placement
Promote selection to layer-Deselect- Mirror
Duplicate your background layer
On the duplicate-Effects-Artistic Effects- Halftone
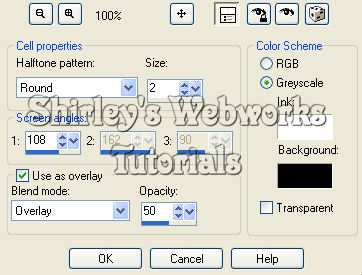
Adjust Blur-Motion Blur- 45, 100%
Blend mode Luminance, or whatever looks good to you
Drop the opacity a little
Paste one of your Tubes and move to the left
Drop Shadow 9, 30, 35, 30
Crop your tag to 600x250
Add a new layer and send to the top
Fill with a dark color from your tube
Select all-Contract by 1px-Delete-Deselect
Now it's time to add your Name, CR info and License# if necessary
Before we animate, lets merge some layers
Close out the Background and Promoted Selection Layers
Merge visible
Unhide all layers-Now you should have 3 layers
The Top Layer with Name, CR, Tube and 1px Border
The Middle Layer with the Promoted Selection Layer
The Background Layer
Animation
Fire up Animation Shop
Over in PSP- Highlight and copy the Promoted Selection Layer
In Ani Shop-Paste as a New Animation
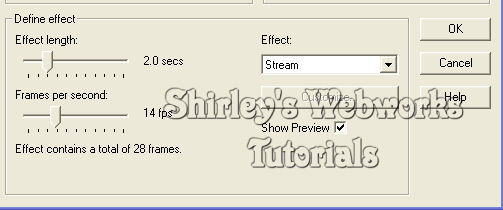
Insert Image Effect
Delete the First and Last Frames
Edit-Select All
Animation-Reverse Frames, Edit- Copy, Edit-Undo Reverse Frames
Select last Frame, Edit-Paste after Current Frame
Animation-Frame Properties-Change to 10
You should have 52 Frames
Minimize this animation for now
Back in PSP
Highlight the Background Layer and Copy
In Ani Shop
Paste as a New Animation
Duplicate Frames until you have 52 Frames-This is your Tag
Edit-Select All, Edit-Copy
Open the first Animation and Edit-Select all
Paste Into current frame-click to place
Back in PSP
Highlight the top layer and copy it
In Ani Shop
Paste as a New Animation
Duplicate Frames until you have 52 Frames
Edit-Select All, Edit-Copy
Open your Tag and Edit-Select all
Paste Into current frame-click to place
View Animation to make sure all is the way you want it
And that's it!
If you try any of my Tutorials, I would love to see
your results. Please post a link in the results
section on my Blog
