|
April 19, 2011 To create this set you will need: PSP and Animation Shop Both Available from Corel A Tube or an Image I used Art by Jessica Dougherty I bought this Tube when the she was with CILM At the time of this writing Tubes and License are available from CDO L en K - Zitah MuRa's Meister - Copies Font of choice - I used P22 Corinthia Ready? Let's Begin! Choose a Dark color for your FG Choose a Light color for your BG On the FG - Make a FG/BG Gradient Angle 45 - Repeats 3 ***Use these Instructions if using a Tube*** Open your Tube in PSP Shift+D to copy your Tube and close the original Resize to 225 px High - Width should be around 150px The Tube I used above was originally 500 px high I resized it twice-sharpening once each time Give it a Blurry Drop Shadow New Layer- Send to Bottom Fill with the Gradient L en K - Zitah
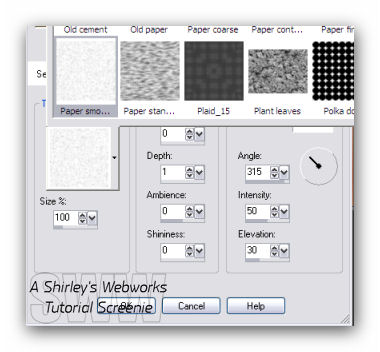
Texture Effects - Texture Use the Paper Smooth Texture
Select All - Contract 5 Promote Selection to Layer - Send to Top Drop Shadow - 0, 0, 50 and 5 Merge Visible
*** If using an Image*** You'll have to crop the Image So it is Longer than it is Tall Then resize it so it's 225 px high - Width should be around 150px If it's a really large Image, you'll have to Resize a little at a time, sharpening each time So as to not lose the quality New Layer - Send to Top Fill with the Gradient Apply the Zitah and Texture Select All - Contract 5 - Delete - Deselect Drop Shadow - 0, 0, 50 and 5 Merge Visible
***Moving On*** New Image 600x250 Fill with your Gradient Apply the Zitah and Texture Copy your Framed Image Paste into the New Image ***Drop Shadow - 0, 0, 50 and 5*** (Don't forget the drop shadow-your result will not be the same if you do!!!) Duplicate On the Original MuRa's Meister - Copies
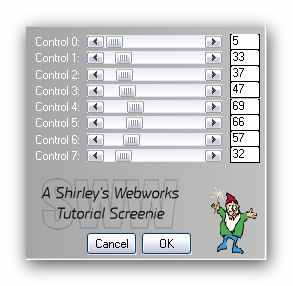
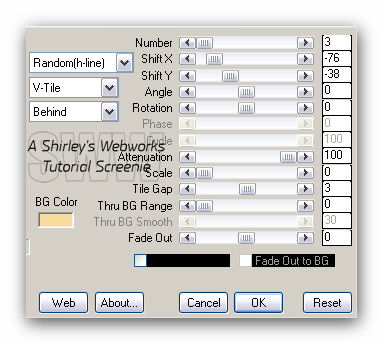
Depending on the width of your Framed Image - You may have to adjust The Shift X Slider On the Duplicate Move the Shift X Slider to the Exact Opposite - In this case - Move the Shift X Slider to 76 Merge the two Copies Layers together Add your Name, CR Info and License# if Necessary
Highlight your BG Layer Duplicate and Send to top Select All - Contract 5 - Delete - Deselect Drop Shadow - 0, 0, 50 and 5 This is the Border
Duplicate your Border Layer Twice for a Total of Three Border Layers On the Bottom Layer Add Noise - Uniform - 60 - Mono Checked On the Middle Layer Add Noise - Uniform - 61 - Mono Checked On the Top Layer Add Noise - Uniform - 62 - Mono Checked
ANIMATION Hide your top two Noise layers - Edit - Copy Merged In Animation shop - Edit- Paste as new animation Back in PSP- Hide the bottom and top Noise layers and unhide the middle one Edit - Copy merged In Animation shop - Edit - Paste after current frame Back in PSP- Hide the bottom and middle Noise layers and unhide the top one Edit-copy merged In Animation shop - Edit- Paste after current frame View animation- If you like it, save as a gif and you're done!
AVATAR Shift+D to Copy your tag On the Copy Delete all Layers but the BG Layer Crop to 150X150 Make the Border like you did for the Tag Add your Name or Initial Animate the Border like you did for the Tag
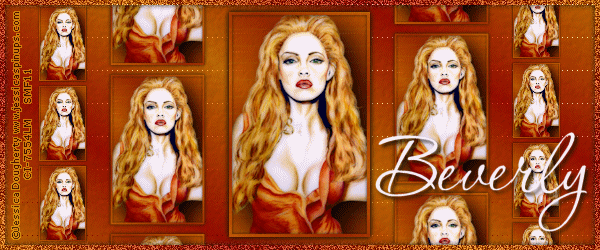
Sample Set:
If you try any of my Tutorials I would Love to see what you made! Please leave a link to your Results In the comments section on my Blog
Tutorial Ideas, Tags/Avis ©Shirley Franklin www.shirleyswebworks.com
|