
March 29, 2011
To create this tag you will need:
A Tube
I used art by the fabulous Ismael Rac
Tubes and License are available at his STORE
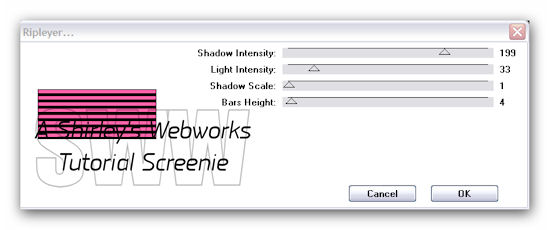
Rorshack Filters- Ripleyer
Font of choice - I used P22 Corinthia (Pay Font)
Ready?
Let's begin!
Choose a light and a dark color for your FG and BG
It doesn't matter which
New Image - 600x250
Fill with your light color
Duplicate
Rorshack Filters- Ripleyer
Magic Wand - RGB - Tolerance 0
Click in one of the light colored bars
Selections - Modify - Select Color Range
Tolerance and Softness 20
Click in the color box and then click on one of your light colored bars
Click ok
Promote Selection to Layer
Selections - Invert
Make sure you're still on your Ripleyer Layer
Promote Selection to Layer
Deselect
Delete the Ripleyer Layer
On the top promoted selection layer
Drop Shadow 1, 1, 50 and 3
On the bottom promoted selection layer
Free Rotate - Left - 45
All Layers unchecked
Crop your Tag
Duplicate the rotated layer twice for a total of three layers
On the bottom one:
Add Noise - Uniform - 91% - Monochrome checked - TWICE
On the middle one
Add Noise - Uniform - 94% - Monochrome checked - TWICE
On the top one
Add Noise - Uniform - 98% - Monochrome checked - TWICE
Let's get what we need for the Avatar
Shift + D to copy the tag
On the copy
Crop tool set at 150x150
Move it where you want it and click the green arrow
New Layer - Fill with the dark color
Select All - Contract 1 - Delete - Deselect
Add your name or initial and animate like the Tag
Back to the Tag
Paste your Tube as a new layer
Send to top
Move left and give it a blurry drop shadow
Crop your Tag
New Layer - Fill with the dark color
Select All - Contract 1 - Delete - Deselect
Add your Name, CR and License # if necessary
Animation
Hide your top two Noise layers - Edit - Copy Merged
In Animation shop - Edit- Paste as new animation
Back in PSP- Hide the bottom and top Noise layers and unhide the middle one
Edit - Copy merged
In Animation shop - Edit - Paste after current frame
Back in PSP- Hide the bottom and middle Noise layers and unhide the top one
Edit-copy merged
In Animation shop - Edit- Paste after current frame
View animation- If you like it, save as a gif and you're done!
That's it, we're done!
Sample Sets - All with art by Ismael Rac

If you try this or any of my Tutorials,
please leave a link to your results in the comments section on my Blog
Tutorial Ideas, Tags/Avis ©Shirley Franklin
www.shirleyswebworks.com
