
To create this set you will need:
PSP and Animation Shop
Both sold by Corel
A Tube and a Close-Up
I used art by Ismael Rac
Tubes and License can be bought at his Store
Alien Skin Eye Candy 5 Textures - Texture Noise
DSB Flux - Bright Noise
MuRa Meister - Cloud
Font of choice
Ready?
Lets Begin!
Choose a light color for your FG and a dark color for your BG
On the FG, make a FG/BG Gradient
Angle 45, repeats 3
New Image 600x250
MuRa Meister - Cloud
Default Settings-hit the Reset button
New Layer
Fill with your gradient
Add Noise - Uniform - 100% - Mono checked
Motion Blur - 315, 100%
Edge Effects - Enhance
Change the blend mode to overlay, hard light
or some other one that you like and merge visible
BORDERS
You will need to refer back to this section to make the borders for the Avatar
Shift+D to make a copy and crop to 150x150
Set aside for now
New Layer - Name Gradient Layer
Fill with gradient - Select All-Contract 2 - Delete - Deselect
Drop Shadow 0,0,80 and 5
Highlight BG Layer and make a New Layer
Select All-Contract 10-Fill with your Dark color- Contract 1-Delete
Keep Selected
Expand 1-Selections Invert-New Layer-Fill with light color-Deselect
Drag this layer to just above the BG and rename ColorBorder
Highlight BG - Paste CU - Move right - Blend Mode Soft Light
Crop your Tag
Paste your Tube and move left-Blurry Drop Shadow
Move this Tube layer to just below the Gradient Layer
Crop your Tag again
Time to add your Name, CR Info and License if necessary
Ok, lets merge some Layers and get ready to animate
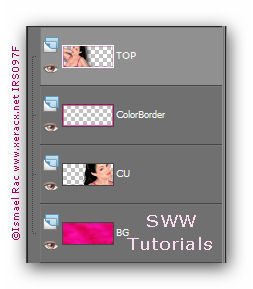
Hide your BG , Close-Up and ColorBorder Layers and Merge Visible
Now your Layer Palette should look like this:
ANIMATION
Duplicate the BG Layer twice for a total of 3 layers
Duplicate the ColorBorder Layer twice for a total of 3 layers
On the ColorBorder Layers:
DSB Flux - Bright Noise - 31, mix checked
Hit the Mix button once each time
On the BG Layers:
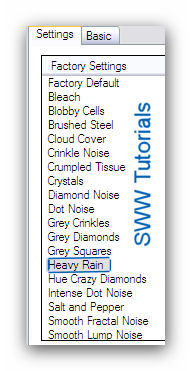
EC5 Textures -Texture Noise - On the Settings Tab:
On the Basic Tab:
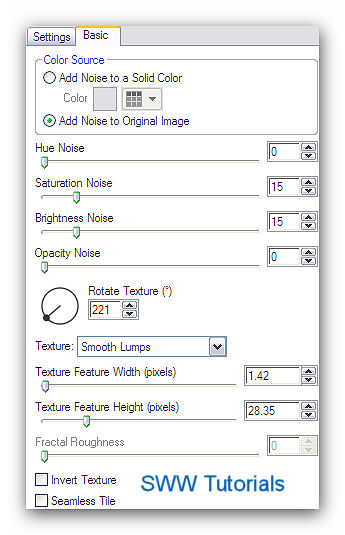
Hit the Random Seed button once for each Layer
It's time to fire up Animation Shop
Hide the top two BG Layers and the top two ColorBorder Layers
Copy Merged and Paste as a New Animation in Ani Shop
Back in PSP
Hide the bottom BG Layer and the bottom ColorBorder Layers
Unhide the middle BG Layer and middle ColorBorder Layer
Copy Merged and Paste after current frame in Ani Shop
Back in PSP
Hide the middle BG Layer and the middle ColorBorder Layers
Unhide the top BG Layer and top ColorBorder Layer
Copy Merged and Paste after current frame in Ani Shop
View Animation to make sure it looks right and if it does-You're Done!
Save as a gif
AVATAR
Remember the 150x150 avatar you made earlier?
Open it-add the same borders and animate the same way
Here's what it looks like:
Another Example, made for my pal Beverly

I love seeing people's results when they try my tutorials.
Please leave a link in the comments section on my Blog
Tutorial Idea, Tags/Avis ©Shirley Franklin
www.shirleyswebworks.com