May 13, 2011 To create this Set you will need: PSP and Animation Shop Both available HERE A Tube I used art by Arthur Crowe The Art used in the above example Is a PSP Party Central Exclusive Tube To get her, you will need to Join HERE There are posting requirements that must be met before you can download and use her Tubes and License for Arthur's other Artwork Available at PTE Do not use this art without a proper license
Font of Choice - I used P22 Petemoss (Pay Font) My Selection - HERE Filter Factory H - Melting Pot MuRa's Meister - Copies Filter Factory L - Send me an Angle Xero - Greytinter AAA Filters - Foto Frame Ready? Let's Begin!
Unzip My Selection into your Selections Folder Copy your Tube and Paste as a New Image Resize 600x250 - All Layers checked - Lock unchecked MuRa's Meister - Copies - Wallpaper(Rotate) - Default Duplicate Layer On the Duplicate - Filter Factory H - Melting Pot
Change the Blend Mode to Screen and Merge Duplicate On the Duplicate Adjust Blur - Radial Blur
Edge Effects - Enhance Lower the Opacity to 70 and Merge Duplicate again On the Duplicate Filter Factory L - Send me an Angle Upper Edge X - 210 All other sliders at 0 Change the Blend Mode to Screen and Merge Selections - Load Selection from Disk Promote Selection to Layer - Twice On the second Promoted Selection Layer Mirror and Flip - Merge Down Duplicate this Layer On the Original - Xero Greytinter - Default Colorize this Layer to match your Tube Merge down into the Background
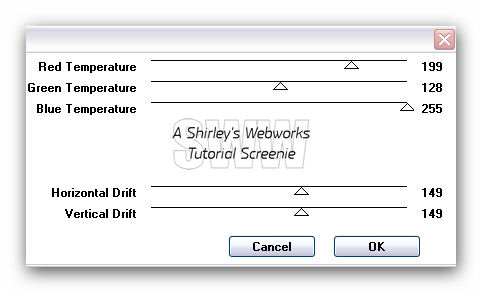
On Both your BG and Promoted Selections Layers AAA Foto Frame Change the Top Number to 9 Matte 1 Opacity 50
Highlight the Top Layer Paste your Tube as a New Layer Position as desired - Drop Shadow of choice Crop your Tag Add your Name, CR info and Lic # if Necessary
ANIMATION Highlight your remaining Promoted Selection Layer Select All - Edit - Copy Open Animation Shop Edit - Paste as New Animation Effects - Insert Image Transition In the Effect Drop-Down Menu, Choose Dissolve - Default Settings
Edit - Select All - Animation - Reverse Frames Edit - Copy Edit - Undo Reverse Frames Scroll over and click in the last Frame to Select it Edit - Paste After Current Frame Now you should have 32 Frames
Back in PSP Highlight the Background Layer Edit Copy
Back in Animation Shop Edit - Paste as a New Animation Hold down the ctrl key and hit the L key repeatedly to make 32 Frames
On the First Animation Edit - Select All Edit - Copy You can delete this Animation as we don't need it any more.
On your second Animation (This is the Tag) Edit - Select All Edit - Paste into Selected Frame
Back in PSP Hide your BG and Promoted Selections Layer Edit - Select All Edit - Copy Merged
Back in Animation Shop Edit - Paste as a New Animation Hold down the ctrl key and hit the L key repeatedly to make 32 Frames Edit - Select All Edit - Copy You can delete this Animation as we don't need it any more
On your Tag Edit - Select All Edit - Paste into Selected Frame Edit - Select All Animation - Frame Properties Change the Number to 15 View animation- If you like it, save as a gif and you're done! **Note: This Tag is very KB heavy**
Finished Set:
If you try this or any of my Tutorials, I would love to see your results! Please leave a link in the comments section on my Blog
Tutorial Idea, Tags/Avis ©Shirley Franklin www.shirleyswebworks.com
|