|
To create this Set you will need: PSP and Animation Shop Both available HERE A Tube I used art by Jennifer Janesko Tubes and License available at CDO Krusty's Vol 1 1.0 - Transparency Grid Xero - Porcelain Font of Choice
Ready? Let's Begin! FG Black - BG White This is important - if you try to use color at this point, it won't look the same We will add color later Make a gradient on the FG
New Image - 600x250 Fill with your gradient
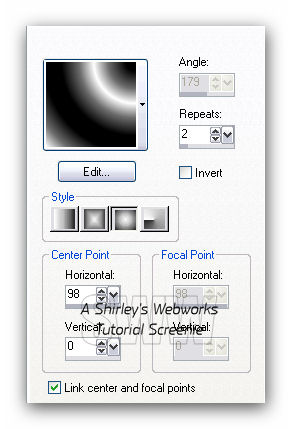
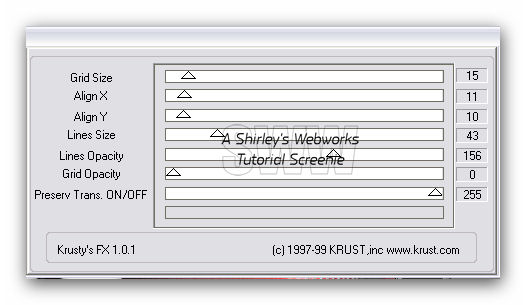
Krusty's Vol 1 1.0 - Transparency Grid
Drop Shadow - 0, 0, 50 and 2
New Layer - Fill with White - Send to Bottom Duplicate the BG Layer Twice for a total of three Layers On the top of these Layers Adjust - Add Noise - Uniform - 65 - Mono checked On the middle Layer Adjust - Add Noise - Uniform - 64 - Mono checked On the bottom Layer Adjust - Add Noise - Uniform - 63 - Mono checked
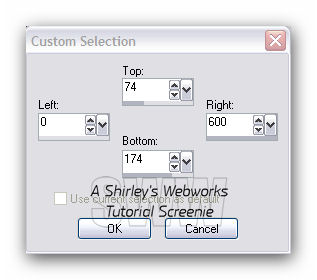
New Layer - Send to Top Selection Tool - Custom Selection
Fill with white - Deselect Xero - Porcelain - All at Default, but the Blue set to 0 Same Drop Shadow as before
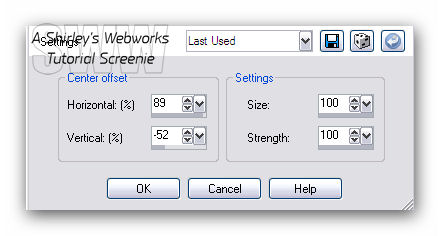
On this Custom Selection Layer and the Transparency Grid Layer Distortion Effects - Warp
Repeat the Drop Shadow on both Layers
Now it's time to add some color if you wish You can use whatever method you wish This is how I did it On ALL layers Adjust - Hue and Saturation - Colorize Saturation 255 - Hue should be a color to match your Tube
Copy and Paste your Tube as a new Layer on your Tag Send to top if it's not already there Position as desired - Give it a blurry Drop Shadow New Layer - Fill with a dark color Select All - Contract 1 - Delete - Deselect Time to add your Name, CR Info and License# if necessary Hide your Three BG Layers and Merge Visible
AVATAR Shift+D to copy your Tag Set your Crop Tool to 150x150 Move to where you want it and hit the green arrow If you have Art in the Avi - Add CR Info Add your Initial Animate as for the Tag
ANIMATION Hide your top two BG layers - Edit - Copy Merged In Animation shop - Edit- Paste as new animation Back in PSP- Hide the bottom BG layer and unhide the middle one Edit - Copy merged In Animation shop - Edit - Paste after current frame Back in PSP- Hide the middle BG layer and unhide the top one Edit-copy merged In Animation shop - Edit- Paste after current frame View animation- If you like it, save as a gif and you're done!
Sample Set
If you try this or any of my Tutorials, I would love to see your results! Please leave a link in the comments section on my Blog
Tutorial Idea, Tags/Avis ©Shirley Franklin www.shirleyswebworks.com
|