10/27/15 To create this Tag you will need: A Tube and a Close-up I used art by Barbara Jensen Tubes and License available HERE
Filters: MuRa Meister - Copies Alien Skin Eye Candy 5 Nature - Rust Alien Skin Xenofex 2 - Electrify AAA Frames - Foto frame Photo Tools - Frosted Edger Black
Corel PaintShop Pro X5 and Jasc Animation Shop
Ready? Let's Begin!
Choose two colors from your Tube for FG and BG Copy your Tube and Paste as a New Image Image - Canvas Size - Change both Width and Height to 700 Tick the center square in the Placement box MuRa Meister - Copies - H-Tile(line) - Default Settings Add a Layer and Fill with one of your Colors Move this Layer to the Bottom and Merge Visible
Duplicate On the Original Adjust - Blur - Motion Blur Angle 84 - 100% Edge Effects - Enhance On the Duplicate Adjust - Blur - Motion Blur Angle 180 - 100% Edge Effects - Enhance Change the Blend Mode to Overlay or one you like better Merge Visible Image Effects - Seamless Tiling - Default Settings
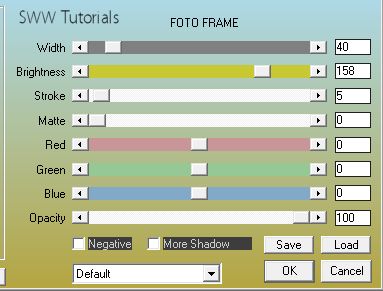
Duplicate AAA Frames - Foto Frame
Select All - Contract 40 - Invert - Promote Selection to Layer Select the Middle Layer - Delete - Deselect
On the Bottom Layer Photo Tools - Frosted Edger Black - Default Settings
On the Middle Layer Filter Factory V - Ommadawn - Default Settings Pull the Opacity down to about 60
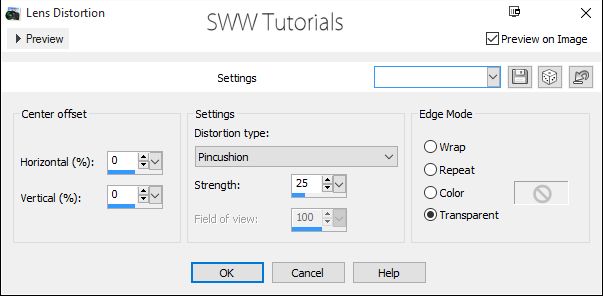
On the Promoted Selection Layer Effects - Distortion Effects - Lens Distortion
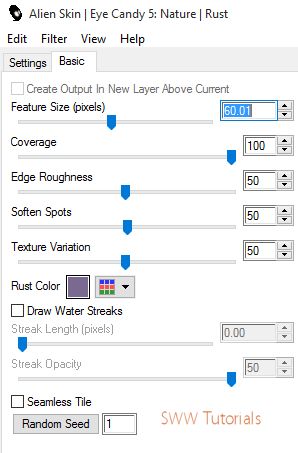
Duplicate and Rotate 45 degrees left Drag this layer to just above the Background Layer Call this Layer Electrify Alien Skin Eye Candy 5 Nature - Rust
Choose either Foreground or background color by clicking the little arrow In the Rust Color Box Do the same thing to the Promoted Selection Layer, but choose your other color
Select the Promoted Selection Layer
Use your Magic Wand and Click in the Middle
Paste your Closeup Change the Blend Mode to Luminance or another you like better Lower the Opacity a little Invert Selection and Delete - Deselect
Resize your Tag to 650X650 or smaller if you need it to be
Select the Top Layer Paste your Tube and position where you want it Drop Shadow - 20, 20, 100 and 100 Add your Name, CR Info and License#
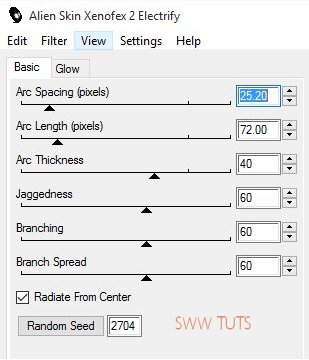
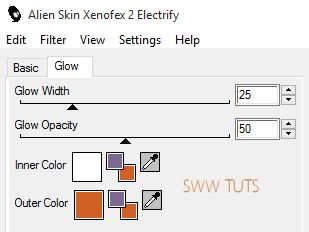
AnimationSelect your Electrify Layer and duplicate it Twice On each of these Layers Alien Skin Xenofex 2 - Electrify
Change the Outer Color to the lightest of your Colors Hit the Random Seed Button for Each Layer Hide the Top Two Layers Copy merged and Open Animation Shop(AS) Paste as a New Animation
Back in PSP Hide the Bottom and Unhide the Middle Electrify layer Copy Merged Back in AS - Paste After Current Frame Back in PSP Hide the Middle Electrify Layer and Unhide the Top one Copy Merged Back in AS - Paste After Current Frame Save as a GIF and you're done!
Another Sample also with Art by Barbara Jensen
If you try this, or any of my Tutorials I would love to see what you made Please Post results and comments on my Fanpage
|