|
June 13, 2011 To create this Set, you will need A Tube and a Close-up I used art by Jose Cano Tubes and license availible from PTE
DSB Flux - Bright Noise Xero - Porcelain
Ready? Let's Begin! This is an easy one Choose Light and Dark Colors for your FG/BG New Image - 600x250 Fill with your Light Color New Layer - Fill with your Dark Color Be sure you're on your Dark Color Layer Select All - Contract 10 - Invert - Delete -Deselect
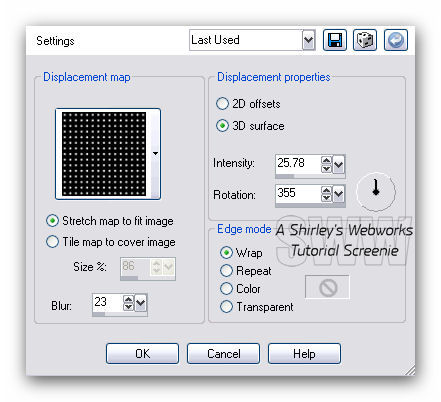
Effects - Distortion Effects - Displacement Map
You'll have to use the little drop down arrow to choose the correct map I used the one called Grid - It's a pattern included in PSP X2 Paste your close-up and position where you like it Highlight your Displacement Map Layer Select All - Float - Defloat - Invert Highlight your close-up Layer - Delete - Deselect Give this tube a drop shadow Play with the Blend Modes and Opacity til you get what you like Hide the BG and Merge Visible Xero - Porcelain - Blue to 0 Drop Shadow 0, 0, 70 and 5
Paste your Tube as New Layer - Position as desired You can run the Porcelain on this too if you want to Crop your Tag New Layer - Send to Top Fill with your Dark Color Select All - Contract 2 - Delete - Deselect Drop Shadow 0, 0, 70 and 5 Add your Name, CR info and License # if necessary Hide your BG Layer - Merge Visible Unhide your BG Layer and Duplicate it Twice for a Total of Three Layers On each of these - DSB Flux - Bright Noise 18 - Mix Checked - Hit the Mix Button once for each Layer
ANIMATION Hide the top two BG Layers - Copy Merged Open Ani Shop - Paste as a New Animation Back in PSP - Hide the bottom BG Layer Un-Hide the middle one - Copy Merged In Ani Shop Paste after Current Frame Back in PSP - Hide the middle BG Layer Un-Hide the Top one - Copy Merged In Ani Shop Paste after Current Frame View Animation If it looks right, save as a Gif
AVATAR New Image - 150x150 Fill with your Light Color New Layer - Fill with your Dark Color Be sure you're on your Dark Color Layer Select All - Contract 10 - Invert - Delete -Deselect
Effects - Distortion Effects - Displacement Map Same Settings as before Xero - Porcelain - Blue 0 Drop Shadow like for the Tag Make a 2 px border like for the Tag Same Drop Shadow Duplicate the BG Twice for a Total of Three Layers On each of these - DSB Flux - Bright Noise 18 - Mix Checked - Hit the Mix Button once for each Layer Add your Initial Animate like you did for the Tag
Sample Set:
If you try my tutorials, I would love to see your results Please post a link in the comments section on my Blog
Tutorial idea Tags/Avis ©Shirley Franklin http://www.shirleyswebworks.com
|