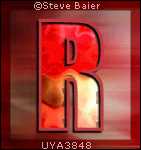
DSB Flux Filters - Two WaysToday, we will be making these tags The first one features art by Steve Baier Tubes and License can be bought at UYA
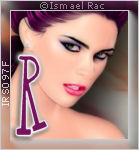
The second one features art by Ismael Rac Tubes and License can be bought at his Store
These tags were made in PSP X2 and Animation Shop Filters: Mirror Rave - Quadrant Flip Neology - Sinus Waves MuRa Meister- Copies DSB Flux - Bright Noise and Bubbles AAA Frames-Foto Frame Alien Skin EC5 Textures-Texture Noise Xero-Porcelain
Ready? Let's Begin! New Image 600x250 Paste your tube as a new layer MuRa Copies-Wallpaper Rotate-default settings Duplicate layer and hide the duplicate Crop your tag to 600x250
On the original tube layer: Mirror Rave- Quadrant Flip From top to bottom, these settings: 95, 201, 208 and 116 Then Neology-Sinus Waves From top to bottom, these settings: 38, 112, 11 and 18 Then Adjust-Blur-Radial Blur Zoom-Elliptical checked Strength 49, H -42, V -67, Protect Center 9
On the duplicate layer: Adjust Blur-Motion Blur -Angle 90 -100% - two or three times Edge Effects-Enhance More Play with the blend mode a little here- I used hard light in the first example and screen in the second Merge all Visible
Duplicate, mirror and flip it Again play with the Blend modes Merge all Visible
AAA Frames-Foto Frame In the first one, I pulled the opacity down to 50 For the second one I used the Dark with Grey preset and changed the width to 10 then pulled the opacity down to 45 Add your tube and move to the left give it a blurry drop shadow Crop your tag Add your CR info and License # if necessary
Word Art FG Dark Color from Tube-BG Null-Stroke 3 I used Impact at around 150 to type out 2011 Pull on the handles to stretch it out to where you want it Rasterize type Magic wand tool-click inside each number Modify-Expand 2 Highlight BG layer and Promote selection to layer Keep selected and duplicate Promoted selection twice Keep Selected On all three promoted selections layers: Adjust brightness and contrast to brighten the colors you could colorize these if you wanted to as well Deselect-highlight the numbers layer and add a thin drop shadow 1, 1, 100 and 1 Highlight the bottom promoted selections layer select all-float-defloat
For Tag ONE On the bottom promoted selection layer DSB Flux-Bubbles-these settings From top to bottom 42, 50, 50 and 50 On the middle promoted selection layer DSB Flux-Bubbles Change the frequency to 47 On the top promoted selection layer DSB Flux-Bubbles Change the frequency to 44 Add the rest of your word art and your name Animate as usual but change the frame rate to 25
For Tag TWO On the bottom promoted selection layer Alien Skin EC5 Textures-Texture Noise In the settings tab- heavy rain preset In the basic tab- seamless tile checked and add to original checked Edge Effects-Enhance more DSB Flux- 46 Mix checked
On the middle promoted selection layer Alien Skin EC5 Textures-Texture Noise-same settings Edge Effects-Enhance more Hit the random seed button DSB Flux-same settings-hit the mix button
On the top promoted selection layer Alien Skin EC5 Textures-Texture Noise-same settings Edge Effects-Enhance more Hit the random seed button DSB Flux-same settings-hit the mix button
Add the rest of your word art and your name Animate as usual
Sample Avis:
If you try my tutorials, I would love to see your results. Please leave a link in the comments section of my Blog
Tutorial Idea, Tags/Avis ©Shirley Franklin http://www.shirleyswebworks.com
 |